The Luncheon on the Sand
Patrol LRDG

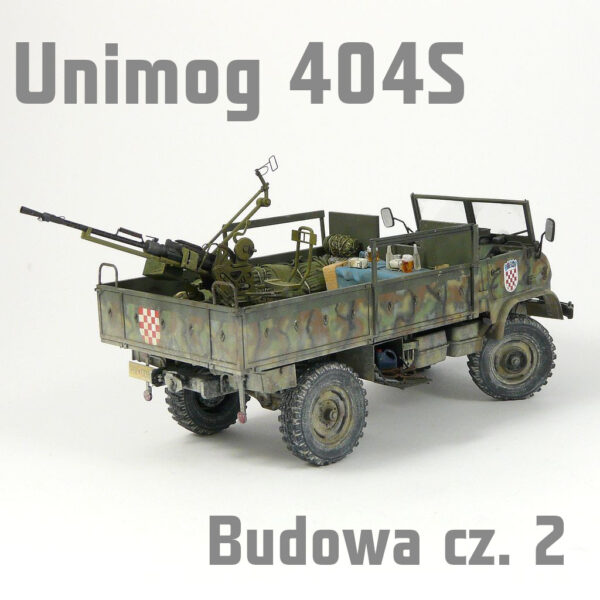
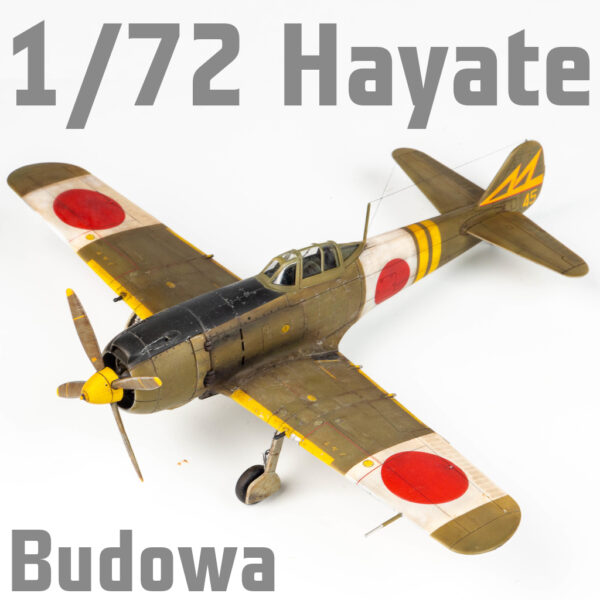
Skoro mamy już omówioną budowę ciężarówki, pora na drugą maszynę. Pomysł na to, by wydarzenia umieścić w cieniu porzuconego lub rozbitego samolotu, tylko na początku wydawał się prosty. Po analizie zdjęć archiwalnych ustaliłem jednak, że niestety samoloty nie rozbijały się w sposób, jaki sobie wymyśliłem. Kolejnym problemem był wybór rodzaju maszyny. Większe bombowce wykluczyłem na wstępie. Nawet Ju 87 Stuka okazał się zbyt duży – przytłaczałby kompozycję całej sceny. Ostatecznie wybór padł na Bf 109 G. Udało mi się też znaleźć zdjęcie archiwalne przedstawiające samolot w pozycji idealnie pasującej do mojej koncepcji – po nazbyt rzutkim lądowaniu zakończonym kapotażem. Sięgnąłem po zestaw z AZ-model, gdyż w porównaniu z innymi, w pudełku wyglądał znakomicie.

Już na wstępie musiałem jednak niektóre pokrywy zaszpachlować (ich obecność to efekt unifikacji wyprasek dla różnych wersji Gustava), oraz dorobić brakującą pokrywę gniazda ładowania sprężonego powietrza

To ostatnie wydrapałem igłą krawiecką, korzystając z fototrawionych szablonów z E.T. Model

Musiałem też dorobić kroplowe mocowania parasola. Zrobiłem je odciskając rozgrzany pręcik polistyrenowy na szablonie z blaszki Eduarda od jakiegoś samolotu. Gotowe detale przykleiłem do kadłuba ‘cienkim klejem’


Montaż kabiny przebiegł bez problemów. Moją uwagę zwrócił poziom precyzji i jakość detali – porównywalny z niejednym modelem 1/48

Posklejane wnętrze kabiny pokryłem warstwą srebrnej farby

Następnie natrysnąłem kolor bazowy Mr.Color C40 German Gray. Eksponowane powierzchnie rozjaśniłem mgiełką mocno rozcieńczonej C13 Neutral Gray

Elementy wyposażenia pokolorowałem akrylami Vallejo

Aby podkreślić detale, użyłem czarnego Washa for NATO Vehicles AK075


Na koniec zrobiłem imitacje uszkodzeń farby. Ostrzem skalpela podrapałem krawędzie, odsłaniając srebrny podkład

Montaż kadłuba nie przysporzył większych problemów

Jedynie w rejonie pokrywy silnika musiałem wypełnić niewielką szczelinę kawałkiem polistyrenu


Oszklenie w modelu składa się z jednej części. Ponieważ planowałem zrobić otwartą kabinę, musiałem je pociąć na trzy kawałki.


Przed przyklejeniem wiatrochronu we właściwym miejscu zamontowałem celownik. Musiałem go delikatnie zwaloryzować, wymieniając toporne imitacje szybek na kawałki cienkiej przeźroczystej folii

Na koniec prac nad kadłubem odtworzyłem linie na łączeniu jego połówek – co jest charakterystyczne dla samolotów Bf 109

Prace nad skrzydłami rozpocząłem od usunięcia wybrzuszeń nad gondolami podwozia. Aby mieć pewność, że powierzchnia będzie płaska, najlepiej użyć pilników, a nie papieru ściernego


Pozycja, w jakiej planowałem ustawić samolot, wymagała ode mnie zrobienia wysuniętych slotów. Ponieważ w modelu nie są one osobnym elementem, zacząłem od starannego ich wycięcia


Odcięte kawałki wkleiłem ponownie w skrzydło, jednak w takiej pozycji, by imitowały one fragment konstrukcji


Na tym etapie zdecydowałem się połączyć skrzydła i kadłub. Elementy te okazały się całkiem dobrze dopasowane. Jedynie od spodu musiałem wypełnić niewielki uskok cyjanoakrylem

Uporawszy się z konstrukcją płatowca, mogłem zabrać się za detale. Ponieważ planowałem ‘zniszczyć’ końcówkę skrzydła, z grubej folii aluminiowej zrobiłem kopię plastikowego elementu


Po usunięciu większej części plastikowej końcówki, w jej miejsce przykleiłem aluminiowe elementy, a następnie je pogiąłem


Sloty zrobiłem z polistyrenu 0.25mm. Odpowiednio wyprofilowane paski wykończyłem od spodu plastikowym pręcikiem i przykleiłem we właściwej pozycji


Aby bez problemu móc wychylić powierzchnie sterowe, ich granice pogłębiłem skrobakiem RB Productions


Zniszczyć musiałem też śmigło. Polistyren był na tyle plastyczny, że łopaty łatwo uformowałem specjalnymi szczypcami do gięcia drutu


Pocieniłem też ścianki kołpaka frezując nadmiar plastiku od wewnątrz. Dzięki temu łatwo mogłem zrobić imitacje wgnieceń i pęknięć tego elementu


Na koniec uzupełniłem golenie podwozia o imitacje instalacji hamulcowej, zrobione z drutu ołowianego 0.3mm

Samolot był gotowy do malowania


Oszklenie zamaskowałem taśmą Tamiya, a jego ramy pomalowałem kolorem wnętrza kabiny


Po nałożeniu srebrnego podkładu na cały model, pomalowałem białe powierzchnie szybkiej identyfikacji


Nieco bardziej kłopotliwe jest malowanie żółtych fragmentów. Dopiero kilka aplikowanych naprzemiennie transparentnych warstw białej i żółtej farby daje zadowalający rezultat. Do cieniowania użyłem dodatkowo Clear Orange


Gdy farba dobrze wyschła, wszystkie powierzchnie szybkiej identyfikacji starannie zamaskowałem, a ich okolice ponownie pokryłem srebrną farbą. Dodatkowo elementy w oryginale kryte płótnem pomalowałem XF-60 Dark Yellow z Tamiya

C72 Intermediate Blue i C1 White posłużyły do zrobienia preszejdingu na dolnych powierzchniach samolotu. Prócz podkreślenia detali, nałożyłem nieregularne plamki i smugi, aby finalnie kolor nie był zbyt monotonny


Na tak przygotowane powierzchnie naniosłem lekko transparentną warstwę koloru podstawowego, czyli Mr.Color C115


Preszejding na górnych powierzchniach zrobiłem w ten sam sposób, użyłem jednak XF-10 Flat Brown z Tamiyi oraz białej Mr.Color C1


Ostateczny kolor uzyskałem nakładając naprzemiennie nieregularne, transparentne warstwy RLM 79 (C119) i Flesh (H44) z Mr.Hobby


Następnie zamaskowałem okolice wnęk podwozia i pomalowałem je kolorem RLM 02

Po zdjęciu wszystkich masek samolot zabezpieczyłem satynowym werniksem


Po nałożeniu kalkomanii (idealnie reagowały na płyny Microscale, a transparentny film znikał zupełnie po wyschnięciu) zabrałem się za podkreślenie linii podziału i detali. Łosza na błękitnych powierzchniach zrobiłem emalią AK-Interactive AK071 Filter for Panzer Gray


Do piaskowych powierzchni w RLM 79 użyłem emalii AK006 Wash for DAK Vehicles


A.MIG-1616 Orange Brown okazał się świetny jako łosz do żółtego fragmentu osłony silnika. Detale podwozia podkreśliłem za pomocą emalii A.MIG-1608 Dark Green Grey


Etap malowania zakończyłem zabezpieczając cały model matowym lakierem bezbarwnym

Nanoszenie śladów eksploatacji zacząłem od zrobienia uszkodzeń farby. Identycznie jak w kabinie, w odpowiednich miejscach delikatnie zdrapałem farbę, odsłaniając srebrny podkład


Delikatnie rozcieńczona emalia Ammo Orange Brown, natryśnięta aerografem, pozwoliła mi uzyskać zabrudzenia na górnych powierzchniach, w tym imitację powierzchni nasączonych wyciekającym smarami czy paliwem


Specyfik A.MIG-1610 Tan Gray zgodnie z zaleceniami producenta jest przeznaczony do łoszowania RLM 65. Moim zdaniem nie jest najlepiej dopasowany do tego odcieniem. Aplikowany aerografem, spisał się natomiast świetnie w roli zabrudzeń na spodzie


Kolejne zanieczyszczenia zrobiłem za pomocą AK082 Engine Grime. Najpierw mgiełkę rozcieńczonej emalii naniosłem na wybrane powierzchnie. Ostateczny wygląd zabrudzeń uzyskałem rolując po nich patyczkiem higienicznym zwilżonym w White Spiricie


Emaliami AK045 Dark Brown Wash i AK084 Engine Oil namalowałem cienkie zacieki. Co ważne, część z nich skierowałem zgodnie z położeniem, w jakim samolot miał znajdować się na podstawce

Okopcenia powstały w dwóch etapach. Najpierw namalowałem delikatne smugi za pomocą rozcieńczonej emalii AK083 Track Wash, naniesionej aerografem


Niezwłocznie, nim emalia wyschła, pod wejściem do kabiny starłem jej nadmiar wykałaczką. W tym miejscu brud rozcierają mechanicy i pilot swoimi ubraniami

Czarne okopcenia namalowałem farbą Tamiya XF-1, mocno rozcieńczoną spirytusem technicznym. Ponownie mniejsza ilość farby trafiła w rejonie wejścia do kabiny


Na koniec przykleiłem wszystkie detale, które w obawie przed uszkodzeniem malowałem osobno


Model był gotowy do zamocowania na podstawce. O tym jednak w kolejnej części opisu prac nad tą scenką

Scenką, którą obejrzeć można w galerii

KFS
P.S. Jeśli podobają się Ci się moje artykuły i chciałbyś wesprzeć ich powstawanie możesz kupić mi czarną paktrę, albo lepiej czarną kawę, w serwisie buycofee.to

..lub, jeśli wolisz PayPal